I help to run a demo/lab environment for Red Hat Pre-Sales in the UK. We heavily use Ansible to automate as much as possible in the lab and we offer push-button Automation to end users via Ansible Tower. I’ve been using Molecule more and more to improve our ability to test and promote changes to Ansible code. I wanted to write up a few different scenarios I have come across for using Molecule. I have previously written about Molecule for testing roles against VMware VM’s. Before we look at a new scenario, a quick recap - Molecule is a tool to aid with the testing and development of Ansible roles. It allows users to spin up test infrastructure to provide a quick and easy means with which to test Ansible roles.
One of the key “services” we provide within our lab is the ability for users to provision VM’s at the click of a button from Ansible Tower. We have Ansible roles that provision Virtual Machines against different platforms (VMware and OpenShift Virtualisation) and we wanted to use Molecule to test these roles like everything else. This flips the standard use of Molecule on it’s head slightly as Molecule is typically used to provide the temporary infrastructure needed develop and test Ansible roles. In our case, the Ansible role is a provisioning role so there is no need for molecule to provide any temporary infrastructure.
Why Bother?
I did wonder this myself at first but actually there are a number of reasons. Firstly, we wanted consistency in the way that we develop Ansible roles. In addition to this, molecule provides a really nice way to develop Ansible roles with immediate feedback. It also provides the means with which to validate roles against best practices with Ansible lint, checking if roles are idempotent and verifying if our roles do what we expect. Finally, as part of our CI process we invoke a full molecule test sequence against our roles to confirm that the Ansible roles we are committing are of a decent standard and also making it easier for reviewers to check the results of our CI pipelines.
Getting started with Molecule
My previous post explains the steps for installing molecule and getting started with it. Head there if you are new to molecule or over to the docs site.
Typical Molecule usage
Normally, the create stage of Molecule is responsible for creating the temporary infrastructure for developing and testing roles. This would typically be a container (podman or docker) or as per my previous post, a VM on a platform like VMware or AWS. The converge stage would then run the Ansible role against the test infrastructure. In this scenario we basically want to skip the create stage - we don’t need molecule to provide us with any test infrastructure. All we need Molecule to provide us with is an inventory with the relevant variables so that we can run our provisioning role. The converge stage in this instance is what Molecule would typically consider the create stage.
Molecule Configuration
Our VM provisioning job relies on a number of user inputs - name of the VM, amount of RAM, number of cpus and RHEL version (RHEL7 or RHEL8). We normally prompt users for these values in Ansible Tower using a survey. To test our VM provisioning role with Molecule, we need to provide these same inputs.
Here are the contents of the main Molecule configuration file molecule.yml.
---
dependency:
  name: galaxy
driver:
  name: delegated
platforms:
  - name: molecule-rhel8.demolab.local
  - name: molecule-rhel7.demolab.local
provisioner:
  name: ansible
  inventory:
    group_vars:
      all:
        cluster: rhnode2
        memory: 2048
        cpu_cores: 2
        demolab_domain: demolab.local
        datastore: datastore1
        template_version: 50
    host_vars:
      molecule-rhel8.demolab.local:
        rhel_version: rhel8
        vm_ip: 10.50.0.200
      molecule-rhel7.demolab.local:
        rhel_version: rhel7
        vm_ip: 10.50.0.201
verifier:
  name: ansible
lint: |
  ansible-lint --exclude molecule/default/
Let’s break this configuration file into sections:
- Driver - note the use of the delegated driver. This gives us the flexibility to write our own playbook to create test infrastructure for Molecule. In this instance we don’t need Molecule to create anything but we’ll come on to that.
- Platforms - this is the list of VM’s we want Molecule to create for us. Again, in this instance we just want Molecule to create the inventory for us - not the VM’s!
- group_vars - here we are defining the global variables for the VM creation role. Things like the VMFS datastore, cpu core count etc
- host_vars - here we are setting host specific variables. We want to test both RHEL7 and RHEL8 instances so we are setting the rhel_version variable here. We are also providing an IP address to statically configure the test instances.
- lint - the final section just configures ansible-lint as the linting tool. We are excluding the molecule directory from any lint tests.
The create.yml playbook
Looking at the create.yml playbook (usually responsible for creating temporary infrastructure) we can see that we are basically skipping this step and just using it to populate molecule with instance data so that we can use it’s inventory in the converge phase. The only thing we have changed here from the default create.yml is adding a debug task to indicate that we are skipping provisioning. We’ve also reduced the amount of data we are passing to Molecule as instance data. We don’t need to connect into the VM in this scenario so we don’t need to pass things like usernames, passwords or SSH keys.
---
- name: Create
  hosts: localhost
  connection: local
  gather_facts: false
  no_log: "{{ molecule_no_log }}"
  tasks:

    - name: create molecule inventory
      debug:
        msg: skipping provisioning

    - block:
        - name: Populate instance config dict
          set_fact:
            instance_conf_dict: {
              'instance': "{{ item.name }}", }
          with_items: "{{ molecule_yml.platforms }}"
          register: instance_config_dict
Validate the configuration
Running molecule create should now create the inventory for the test instances. Let’s check it:
$ molecule create
$ molecule list
INFO     Running default > list
                               ╷             ╷                  ╷               ╷         ╷
  Instance Name                │ Driver Name │ Provisioner Name │ Scenario Name │ Created │ Converged
╶──────────────────────────────┼─────────────┼──────────────────┼───────────────┼─────────┼───────────╴
  molecule-rhel8.demolab.local │ delegated   │ ansible          │ default       │ true    │ false
  molecule-rhel7.demolab.local │ delegated   │ ansible          │ default       │ true    │ false
                               ╵             ╵                  ╵               ╵         ╵
If we want to, we can check the inventory we have created:
$ ansible-inventory -i ~/.cache/molecule/ansible_molecule_create_vm/default/inventory/ansible_inventory.yml  --graph
@all:
  |--@ungrouped:
  |  |--molecule-rhel7.demolab.local
  |  |--molecule-rhel8.demolab.local
And look at the variables for a specific host:
$ ansible-inventory -i ~/.cache/molecule/ansible_molecule_create_vm/default/inventory/ansible_inventory.yml --host molecule-rhel7.demolab.local
{
    "ansible_host": null,
    "ansible_port": null,
    "ansible_user": null,
    "cluster": "rhnode2",
    "cpu_cores": 2,
    "datastore": "datastore1",
    "demolab_domain": "demolab.local",
    "memory": 2048,
    "molecule_ephemeral_directory": "{{ lookup('env', 'MOLECULE_EPHEMERAL_DIRECTORY') }}",
    "molecule_file": "{{ lookup('env', 'MOLECULE_FILE') }}",
    "molecule_instance_config": "{{ lookup('env', 'MOLECULE_INSTANCE_CONFIG') }}",
    "molecule_no_log": "{{ lookup('env', 'MOLECULE_NO_LOG') or not molecule_yml.provisioner.log|default(False) | bool }}",
    "molecule_scenario_directory": "{{ lookup('env', 'MOLECULE_SCENARIO_DIRECTORY') }}",
    "molecule_yml": "{{ lookup('file', molecule_file) | from_yaml }}",
    "rhel_version": "rhel7",
    "template_version": 50,
    "vm_ip": "10.50.0.201"
}
There are a bunch of molecule specific variables in the output but the main thing we want to check here are the host specific variables. For example, we can see the rhel_version variable is set to rhel7 as expected.
A note on credentials
As mentioned at the start of this post, the end goal for this role is via self-service in Ansible Tower. Ansible Tower provides credential management capabilities so we don’t need to specify any credentials in our role. For Molecule testing from the CLI we can set environment variables - for example VMWARE_PASSWORD. We can also set these environment variables in our CI pipeline.
Writing the actual role and testing!
We can now write our VM creation role as usual. The full example is in my github repo. With the role written we can begin to test and continue to develop as necessary. The converge phase will create the different variations of VM’s in our target virtualisation platform - in this case a RHEL7 and RHEL8 VM in VMware.
PLAY [Converge] *************************************************************************************************************

TASK [Include ansible_molecule_create_vm] ***********************************************************************************

TASK [ansible_molecule_create_vm : create vm from template] *****************************************************************
changed: [molecule-rhel8.demolab.local]
changed: [molecule-rhel7.demolab.local]

PLAY RECAP ******************************************************************************************************************
molecule-rhel7.demolab.local : ok=1    changed=1    unreachable=0    failed=0    skipped=0    rescued=0    ignored=0
molecule-rhel8.demolab.local : ok=1    changed=1    unreachable=0    failed=0    skipped=0    rescued=0    ignored=0
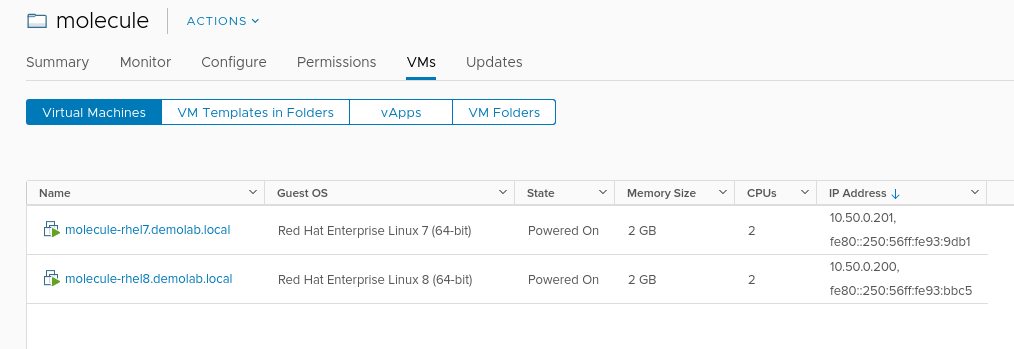
And checking in VMware we can see the VM’s as requested:
Destroying the VM’s
This step is nice and easy. Just take the standard destroy.yml playbook that molecule creates for us and add the necessary tasks to destroy the VM’s in the target virtualisation platform e.g.
- name: Remove VM from VMware
      vmware_guest:
        validate_certs: no
        name: "{{ inventory_hostname }}"
        state: absent
        datacenter: demolab
        force: yes
      delegate_to: localhost
Now simply run the following to destroy the VM’s:
$ molecule destroy
Running a full test
To execute a full test sequence including linting, testing the role, and checking role is idempotent run the following.
$ molecule test
This can easily be incorporated into existing toolchains such as CI pipelines.
Git repository
The example used in this post is available on github - https://github.com/pharriso/ansible_molecule_create_vm.
Next Steps
Molecule is really flexible tool for testing and developing Ansible roles - mainly because you have the full capabilities of Ansible to configure the development environment and any testing you want to perform. This makes it really simple to consume as well. I don’t need to learn another tool or language - I am just writing Ansible.
As I mentioned at the start, this scenario gives me a consistent way of developing and testing Ansible roles and the ability to run a full test sequence with Molecule as part of my CI pipeline. This then makes it easier for my peers to review my code changes and the output of them.
Molecule is a community project and isn’t supported by Red Hat at the time of writing.
Learn more by reading the official documentation for molecule.