I’ve written about dynamic inventories before and why they are useful both around constructed inventory plugins and on ansible.com/blog around the servicenow plugin - so I won’t repeat it all again here. Dynamic inventories are great for allowing Ansible to use other platforms to provide a list of endpoints to manage and also to help to classify those endpoints. If we take the VMware inventory plugin as an example, I might not want to import every VMware VM into Ansible as a managed endpoint. This is increasingly important if you are an Ansible Tower customer where you have to pay for the number of endpoints you manage. Fortunately, the majority of inventory plugins allow you to filter based on various attributes so that you only import the endpoints that you need.
There was a problem with the VMware inventory plugin!
A lot of customers like to use tags to classify nodes - it follows the model you would likely use with a public cloud provider like AWS. Ansible dynamic inventories were historically shipped as scripts but they started to move to plugins within Ansible - this followed the model of other plugins like connection plugins, lookup plugins etc. This meant that there was a period where you had the deprecated script alongside the new plugin. In the case of VMware, the “old” VMware Inventory script could do certain things that the “new” VMware Inventory plugin couldn’t do and vice versa. A good example of this is that the VMware inventory script allowed you to filter your inventory but couldn’t handle tags. The inventory plugin could handle tags but couldn’t filter. So if you wanted to filter based on tags you were a bit stuck.
With the move to collections there have been some enhancements to the plugin which now lives in the community.vmware collection. This can handle both tags and filtering. Hooray!
Tags in VMware
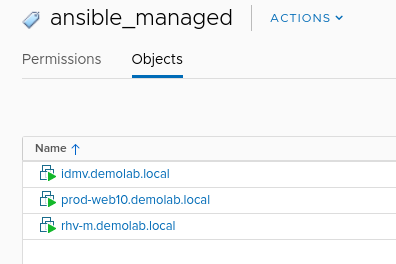
I’m not going to show how to add tags in VMware in this post. But I am going to show that I have a tag called “ansible_managed” and I have associated it to three of my VM’s.
Setting up a Python virtualenv
Our end goal here is to use this inventory plugin from Ansible Tower. In order to collect information on tags from vCenter we need to install an additional python module. We don’t want to start installing 3rd party python modules in our core Ansible Tower python virtualenv, so we are going to do this in a separate virtual environment.
To show the steps I took to create the virtualenv:
$ sudo python3 -m venv /opt/my-envs/vmware_filter_inventory
$ sudo /opt/my-envs/vmware_filter_inventory/bin/pip install psutil
$ sudo /opt/my-envs/vmware_filter_inventory/bin/pip install -U "ansible == 2.9.11"
$ sudo /opt/my-envs/vmware_filter_inventory/bin/pip install PyVmomi
$ sudo /opt/my-envs/vmware_filter_inventory/bin/pip install --upgrade setuptools pip
$ sudo /opt/my-envs/vmware_filter_inventory/bin/pip install --upgrade git+https://github.com/vmware/vsphere-automation-sdk-python.git
Using the inventory from the CLI
To test the plugin from the command line we can create a file called vmware.yml with the following contents. I know the credentials are in plaintext here - we are going to fix that when we run it from Ansible Tower.
plugin: community.vmware.vmware_vm_inventory
strict: False
hostname: vcenter.demolab.local
username: administrator@vsphere.local
password: Password123
validate_certs: False
with_tags: true
properties:
  - runtime.powerState
  - config.name
  - config.guestId
filters:
  - "'ansible_managed' in tags"
hostnames:
  - config.name
keyed_groups:
  - key: config.guestId
    separator: ''
  - key: tags
    separator: ''
Note how we are asking for the tags to be returned and then filtering any hosts which only have a tag that matches “ansible_managed”. To run this from the CLI we first need to source the virtualenv:
$ source /opt/my-envs/vmware_filter_inventory/bin/activate
Let’s run it and see what we get.
$ ansible-inventory -i vmware.yml --list
{
    "_meta": {
        "hostvars": {
            "idmv.demolab.local": {
                "config.guestId": "rhel8_64Guest",
                "config.name": "idmv.demolab.local",
                "runtime.powerState": "poweredOn",
                "tags": [
                    "ansible_managed"
                ]
            },
            "prod-web10.demolab.local": {
                "config.guestId": "rhel8_64Guest",
                "config.name": "prod-web10.demolab.local",
                "runtime.powerState": "poweredOn",
                "tags": [
                    "ansible_managed"
                ]
            },
            "rhv-m.demolab.local": {
                "config.guestId": "rhel8_64Guest",
                "config.name": "rhv-m.demolab.local",
                "runtime.powerState": "poweredOn",
                "tags": [
                    "ansible_managed"
                ]
            }
        }
    },
    "all": {
        "children": [
            "rhel8_64Guest",
            "ungrouped"
        ]
    },
    "rhel8_64Guest": {
        "hosts": [
            "idmv.demolab.local",
            "prod-web10.demolab.local",
            "rhv-m.demolab.local"
        ]
    }
}
Great! We only see the hosts which have the ansible_managed tag.
Using the inventory in Tower
I already wrote a blog post on ansible.com/blog on how you can use inventory plugins from collections in Ansible Tower so I’m not going to explain it all again here. All of the steps you need to set this up are below but if you want more details on the process then please read the blog post.
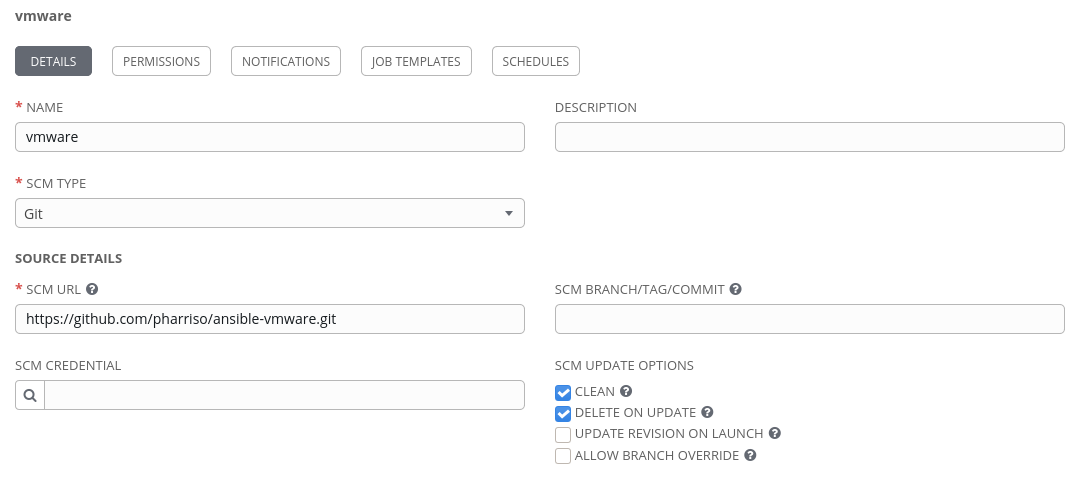
In our git repo we need to add the vmware.yml inventory plugin configuration and also a collections/requirements.yml file that allows Tower to pull in the inventory plugin from the community.vmware collection.
The vmware.yml file - NOTE how the credentials have been removed here. We don’t want credentials in plaintext!
plugin: community.vmware.vmware_vm_inventory
strict: False
validate_certs: False
with_tags: true
properties:
  - runtime.powerState
  - config.name
  - config.guestId
filters:
  - "'ansible_managed' in tags"
hostnames:
  - config.name
keyed_groups:
  - key: config.guestId
    separator: ''
  - key: tags
    separator: ''
And the collections/requirements.yml file - this simply allows Tower to automatically download the collection for us so we can use the inventory plugin:
---
collections:

- name: community.vmware
  source: https://galaxy.ansible.com
Now create a project in Tower that maps to this git repo. In my case:
Create a VMware credential in Tower. We removed the VMware credentials from the yaml file because we didn’t want them in plaintext. Tower will automatically inject the VMware credentials when we sync the inventory as long as we map a valid VMware credential to it. The VMware credential type is shipped with Tower so we just need to fill in the vCenter hostname, username and password:

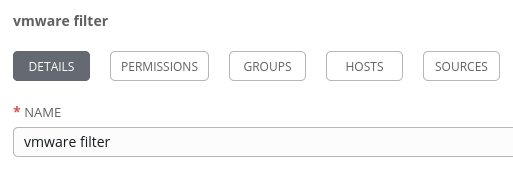
Next create an inventory in Tower. Here it is simply called vmware filter:
Finally add a source to the inventory - this is how we will call the inventory plugin.
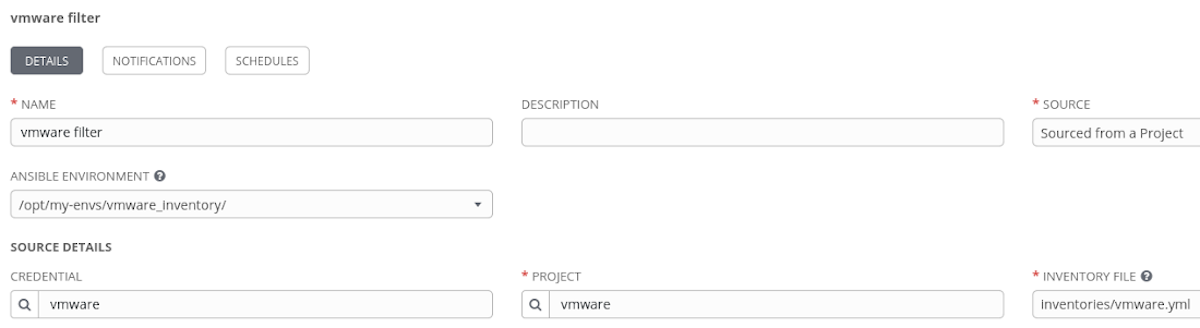
IMPORTANT We need to select our custom python virtualenv here so that it includes the python module we installed. If we don’t do this then the inventory sync will fail! Also note that the VMware credential that we created earlier is mapped here.
Test the inventory filter
We can test the inventory filter by hitting the sync all button. The result should be that you only see the hosts with the relevant tag:

Next Steps
There is a lot more you can do with the VMware inventory plugin. You can take a look at the github site for more information.
There are also a lot more inventory plugins available in Ansible. Head over to the Ansible docs to find a list of plugins available in Ansible 2.9.
Finally, with the move to collections, you will find more inventory plugins shipped with their respective collection. For community collections have a look at galaxy.ansible.com. If you are a Red Hat Ansible Automation Platform customer then have a look in the Automation Hub for a list of certified and supported collections.